
Our Security Boot Camp is now part of the OutSystems offering
Enhance your OutSystems app with push notifications and IoT communication
05-12-2023 • David Nieuwenhuizen
With OutSystems it is easy to build all kinds of mobile applications. However, to communicate with other devices or IoT-devices it is not so straightforward. Recently, I implemented some fun new functionalities in a customer’s mobile OutSystems application, which raised positive feedback. Given the interest in the implementation details, I would like to share with you in this blogpost how to implement push notifications using Firebase and how to communicate with your Internet of Things (IoT) device using MQTT (Message Queuing Telemetry Transport). Along the way, I will elaborate on the benefits and roadblocks I came across during implementation.
How to implement Firebase push notifications
Firebase offers the flexibility to customize push notifications and control their recipients. It also registers whether the notification is received. For example, if the device is turned off, Firebase waits to send the notification to the device until it is turned on. On the device, the notifications can be handled depending on the state of the app. For instance, if the app is active in the foreground the notification can be handled in-app instead of via the notification center at the top of your screen.
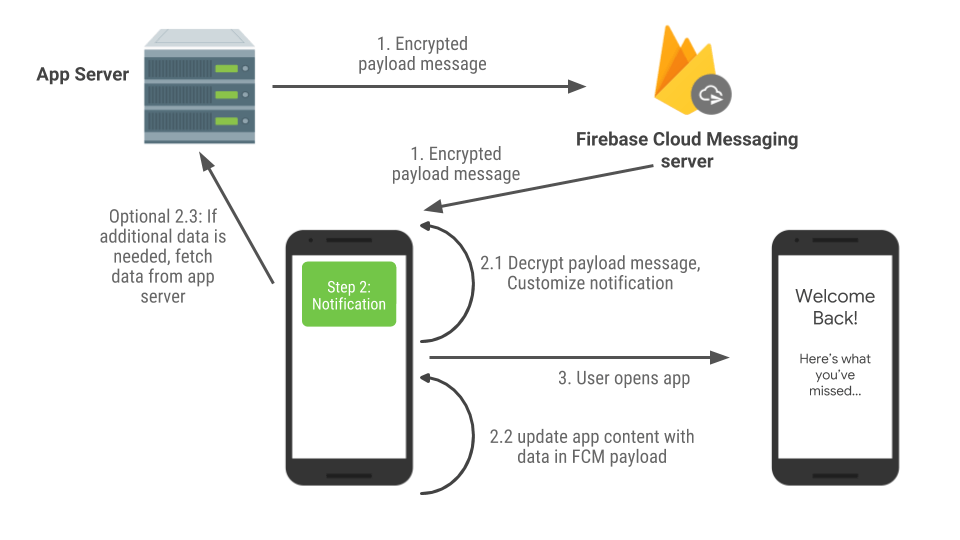
To integrate the Firebase plugin to your OutSystems app, there is a step-by-step guide available in the OutSystems documentation. In short, you start with creating a Firebase project to get an API server key (note that there’s a deprecated version set for removal in June 2024). You can use that key in your own backend module as input for API calls to the Cloud Messaging Configurator module, which, in turn, calls the Google API’s that send the notification details to Firebase. Firebase then handles the message and sends it to all devices it needs to be sent to.
During configuration of a notification, you can customize the title, message, image, and navigation link. Additionally, passing through input parameters for the link is possible by adding key-value pairs to the ExtraDataList input of the API. This gives you even more control over what the user will see when pressing the notification.
In the mobile application you only need to use the client action from the Firebase plugin that registers the device on Firebase. I inserted this in the login flow to automatically register the device without user intervention. For handling in-app notifications when the app is already open, you can implement the in-app notifications web block.
How to connect with IoT Devices through MQTT
MQTT, designed for constrained devices and low-bandwidth networks, serves as a lightweight messaging protocol. Given the limitations of IoT devices, such as being small and battery powered, MQTT stands out due to its minimal message header size and significantly lower energy consumption compared to HTTP.
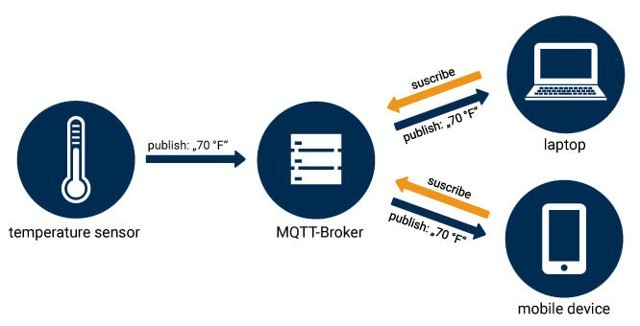
To establish communication between the app and an IoT device via MQTT, create a script on the IoT device to publish data to a specific topic. For testing purposes, I used the public HiveMQ WebSocket to simulate an IoT device for publishing and subscribing to/from different topics easily. For the OutSystems app to work, you need the JavaScript files that contain all connect, publish, and subscribe actions. These can be copied from the MQTTMobileClient plugin from the forge. Then, insert the MQTT web block in a common web block so that each screen contains it. That way you ensure all messages are received and sent properly. You need to make sure that you trigger the OnParametersChanged action of the web block to connect to the desired broker and subscribe to a topic. For publishing messages, use the client action MQTTPublish, which let you insert a topic, payload, and quality of service. Manually check the connection status before publishing to ensure a stable connection to the broker.
And that’s all you need. I enjoyed implementing and working with these two plugins. Implementation is quite straightforward and the possibilities for using these are comprehensive. I hope informing you well and I encourage you to create innovative implementations with Firebase or MQTT as well. Feel free to reach out to me with any questions and thank you for reading my blog!